
What are IP addresses?
Common uses for Internal IP addresses
How do I know what the IP address of my PC is?
Will my PC’s IP addresses always stay the same?
What are external IP addresses?
What can I do with my External IP address?
What is port forwarding?
Turning lights on and off from across the Internet – a practical example
What if my External IP address changes? (Static versus Dynamic IP addresses)
What are IP addresses?
IP addresses are used to allow computers to talk to one another. If the postman wants to deliver a letter to your house then he needs your address. Computers work in exactly the same way.
Each of your computers has an IP address and you perhaps don’t even realise it! Your computers and mobile phones are all given IP addresses by your broadband router so that they can communicate with one another and so that they can transfer files across the internet and across your internal network.

Your router will have the first IP in the range. Most routers will have an IP of 192.168.0.1 and will assign an IP address to each device you connect to it starting with the next number in the range, so if you only have one PC then your PC will be given 192.168.0.2 by the router.
If you then install a new PC and connect it to your router it will be given 192.168.0.3. If you then connect a mobile phone by WIFI then it will be given 192.168.0.4 and so the pattern continues.
Common uses for internal IP addresses
2 of the most common uses for me are:
- To access files in my living room on a PC in my office or bedroom
- To control my media centre (Kodi) PC using my mobile phone as a remote.
1. In Windows we can access files on another machine simply by entering that machine’s IP address into file explorer, like this:

Due to Windows security features we would have to create a homegroup in each Windows machine first to make this work but it just a few simple steps and I have created a guide here
2. I can control Kodi on my living room PC using an app on my phone called Kore simply by entering the IP of the PC that has Kodi on it into the Kore app during setup:

How do I know what the IP address of my PC is?
You can find the IP address of our router and the IP address of your PC on any windows machine by doing the following 2 easy steps:
1 Open command prompt
Start -> Search -> type “CMD” -> press ‘enter’:

2 Run IPCONFIG
Type IPCONFIG into the black window and press enter:

You can see this returns the IP address of the PC I’m using (192.168.0.13), and also a default gateway. The default gateway is the IP address of my router.
Will my PC’s IP addresses always stay the same?
In short no. if I reboot my Living room and office PC’s simultaneously my office PC might reboot faster and pickup the IP address the living room PC used to have, and my Living room PC will pick up the next available address.
This doesn’t matter for the most part because as long as your router knows where your device is on the network it can deliver web pages and email and any other traffic that has been requested by your PC.
This will pose a problem however if you have set a piece of software to specifically send information to a particular IP address such as in my above example where I have set up the Kodi remote on my mobile phone to control Kodi on my living room PC. If My PC’s IP address changes then the Kore remote app will no longer be able to control Kodi as it won’t be pointing at the right address!
We can resolve this by telling our router to reserve 192.168.0.2 for my living room PC. This is known as DHCP reservation. In most routers it is a really straight forward process of selecting the device and reserving an IP:

What are external IP addresses?
All of the above examples are what we call ‘internal IP addresses’. They are the addresses given out by your router to your internal devices and they all start with 192.168.0.something. (Depending on the manufacturer, your router may dish out addresses that start with 192.168.1.something, or 10.0.0.something)
Out on the Internet there are what we call ‘external IP addresses’ that allow all the computers in the world to talk to one another and your router has one too.
Your ISP gives you an external IP address to enable you to communicate with other devices on the Internet. Without it Google wouldn’t know who to send the search results back to when you performed a search!

What can I do with my External IP address?
Well this is where it gets really clever. We can tell our router to send certain types of traffic to certain devices in our internal network when a request comes in from the Internet. In home automation it means we can send requests over the Internet to our router and have that request automatically delivered to a device on our internal network that in turn could do practically anything. In my case I want to be able to switch my lights on.
For example; I have an android device in my internal network that is capable of switching my lights on and off, and I can configure it to do so when I visit a particular address on the internet. This means that if I go on holiday and I want to turn my lights on to fool potential Burglars into thinking I’m home then I can simply visit that address on my laptop and my lights will come on.
To do this I have to configure my router to forward those specific requests to that device:

That’s where port forwarding comes in…
What is port forwarding?
Every bit of traffic that is sent to your router is sent on what we call a ‘port number’. For example if you visit www.bbc.co.uk in your browser then the webpage is automatically delivered to your router on port 80 and your router delivers it to whichever device requested it. Port 80 is the Internet standard port for delivering web pages.
We can configure what is called ‘port forwarding’ on the router and tell our router that any traffic sent to a specific port must be automatically forwarded to a specific device on our internal network.

Turning lights on and off from across the Internet
I have installed the RM plugin from the Android marketplace on an old phone that I leave switched on at all times. The RM plugin interfaces with a very affordable and really easy to setup Chinese RF controller called the RM pro and its the RM plugin that enables me to switch lights off using Alexa:

That’s right, even Alexa is given an internal IP by your router!
There is an easy to follow video tutorial on how to set the above scenario up here. The video will walk you through how to install the RM pro and have it controlling light switches and Plug sockets in no time at all.
The example in my above image works without any port forwading because Alexa is connected to our internal network. If I want to replace Alexa with a device out on the Internet then I have 3 things that I need to do

1 First we need to set up port forwarding on our router to send all requests for port 9876 to the android device that the RM plugin is on:

2 We then need to enable the web server functionality in the RM plugin in the settings so that it will respond to the request:

3 Now that our router is forwarding requests to the device and the device is configured to answer I just need an address to visit to switch my lights on.
The address to control my light switch follows this format:
http://username:password@my router’s external IP address/send?deviceMac=mac address of my RM pro without colons&codeId=code number of the device I want to control
These things are all easy enough to find:
- Username: is in the above screenshot (Root)
- Password: is in the above screenshot (alpine). You should change this password to avoid people hacking you and controlling your lights!
- my router’s external IP address: go to www.whatismyip.com and the internet will tell you what your IP is!
- mac address of my RM pro: from the main menu of the RM plugin go to


- code number of the device I want to control: is listed in the “code list” section


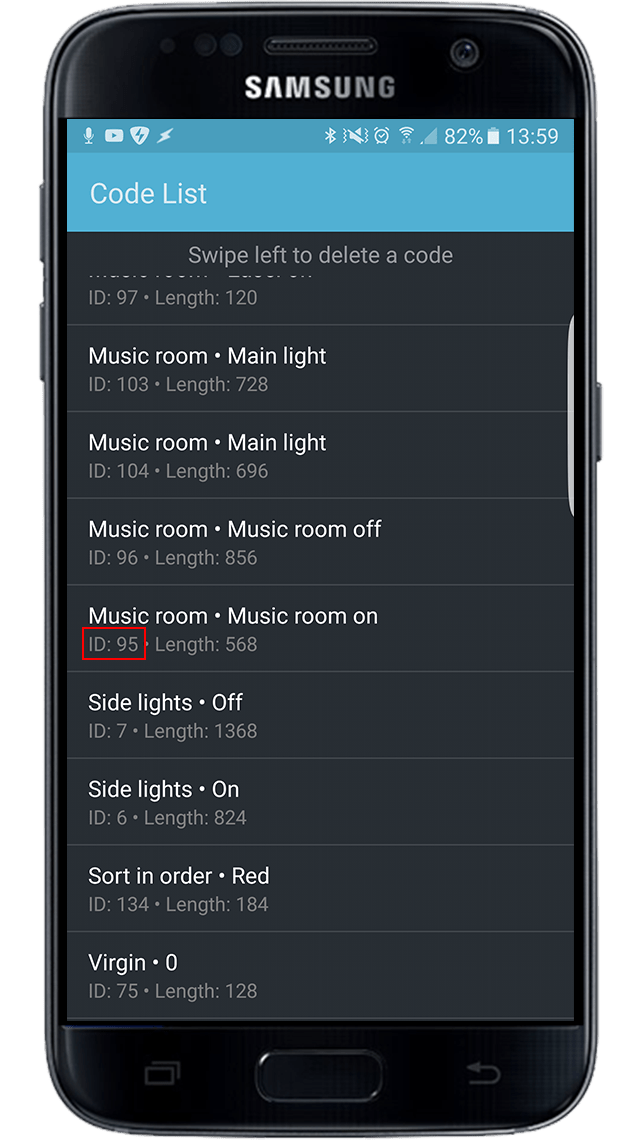
So if I put all that together then visiting this address should switch my music room lights on: http://root:alpine@85.189.25.52/send?deviceMac=b4430d30aa62&codeId=95
What if my External IP address changes? (Static versus Dynamic IP addresses)
Your Broadband supplier will give you either:
- A static IP address. This means your IP will always be the same when you connect.
- A Dynamic IP addresses. This means your IP changes each time you reconnect to the internet.
If your external IP address changes then you will have to keep updating all the above settings to reference your new address 🙁 Fortunately there is an answer to this problem.
If your ISP gives out Dynamic IP addresses then you can sign up for a free service called DDNS with a company called Dynu. Dynu will supply you with a unique address that will never change.
This address will be alpha rather than numeric and it will send traffic to your router in the same way as your IP address does. This means you can follow any of the above guides and simply replace the external IP address with your Dynu address once you’ve set it up.


